Marquette’s Office of Information Technology Services has launched a new pilot program to ensure sensitive information is handled in a safe and responsible manner.
Each member of the Marquette community plays a part in keeping our information secure. By “classifying” information/data — deciding how sensitive it is and who should see it — we help maintain trust, follow laws and regulations, and keep our community strong.
Using Microsoft’s sensitivity labels, users can classify files in one of three categories – Public, Confidential and Controlled – to guide usage of the materials. Think of them as digital “sticky notes” that travel with your files and emails, reminding everyone how they should be handled.
Why classifying data matters
At Marquette, we share all kinds of information — from public event flyers to personal student records.
By using the right data classification level, we help ensure that:
- Privacy is respected. Sensitive information, like student data or personal records, isn’t seen by people who shouldn’t have it.
- Trust is maintained. Students, faculty, staff and partners know their information is handled responsibly.
- Policies and regulations are followed. Staying within rules and guidelines helps protect the university and everyone who learns and works here.
Three levels of classification
1 – Public Information
- What it’s for: Information you’d be comfortable sharing openly, like content already on Marquette’s public website.
- Examples: Event schedules, press releases, course descriptions.
- Sharing: Can be shared with anyone, inside or outside Marquette.
2 – Confidential Information
- What it’s for: Material meant primarily for people within the university or trusted external partners. It’s not a secret, but it shouldn’t be openly posted online.
- Examples: Internal newsletters, draft policies, department budgets.
- Sharing: Generally kept within Marquette or shared carefully with selected partners.
- Sublabels: If your email or document is at this level, you will need to select a sublabel:
- Marquette General: For internal daily use among staff and faculty.
- Marquette Internal Only: Sensitive materials restricted to internal sharing.
- External Sharing Allowed: Sensitive content that can be intentionally shared with trusted external collaborators.
3 – Controlled
- What it’s for: Highly sensitive information that, if shared incorrectly, could cause serious harm or break the law/regulations.
- Examples: Personal student records, protected health information, sensitive research data.
- Sharing: Strictly limited. Usually only a few people at Marquette need to see it, and external sharing should be rare or handled with special approval.
- Sublabels: If your email or document is at this level, you will need to select a sublabel:
- Marquette Internal Only: Strictly limited access within the university community.
- External Sharing Allowed: Requires explicit decision-making to share outside the university’s secure environment.
By choosing the right level, you’re essentially deciding how high the “wall” should be around the information.

Picking the right classification
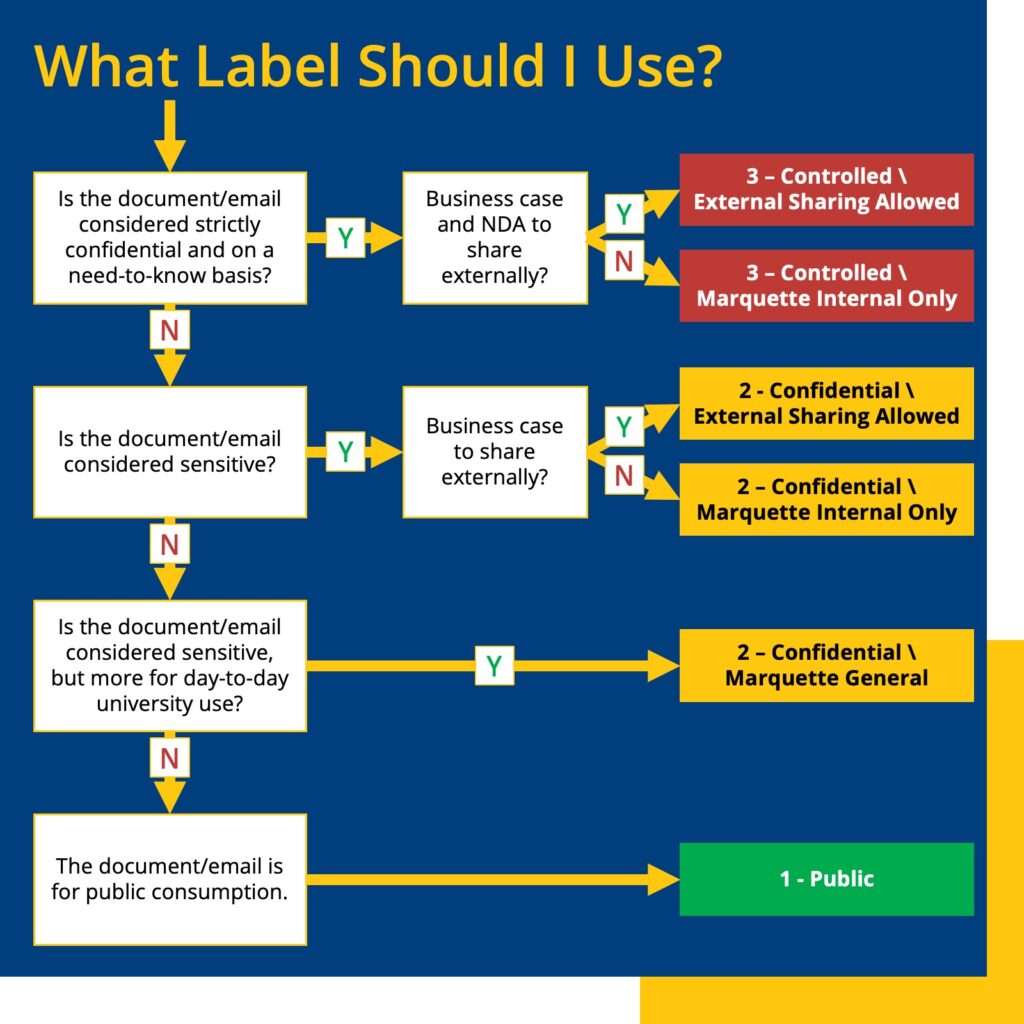
Before sending an email, ask yourself:
- Is this information something we’d put on a public webpage? If yes, it’s probably Public.
- Would sharing it too widely cause a problem, but it’s not the most sensitive data we have? Then it’s likely Confidential.
- Could this data harm someone’s privacy or break the rules if shared improperly? That’s Controlled.
If you’re unsure, choose the more careful option. More information about how each classification protects our information is available online.
How to use Microsoft’s sensitivity labels
Once you’ve decided on the right data classification, adding it to your documents and emails is simple.
- Open your file or email: Start by composing or editing it in Office 365 (e.g., Word, Excel, Outlook).
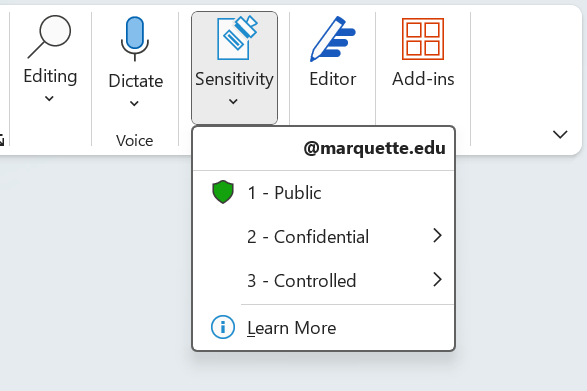
- Click the “Sensitivity” button: Look for “Sensitivity” at the top of the screen in your Office 365 application.
- Select the label: Choose Public, Confidential, or Controlled, depending on the data’s sensitivity. For Confidential and Controlled, select the appropriate sublabel.
- Save or send as usual: Your chosen label now travels with your document or email, helping others know how to treat it.
More information is available on the Cybersecurity website, including a list of frequently asked questions.